1 What are underfloor heating
Warm electric floor is a cable heating system of increased reliability, which can be used both as a system of comfortable floor heating and as the main heating system. The heating sections of underfloor heating systems are shielded single-core and two-core cables with two layers of insulation, as well as reliable couplings. From traditional methods of heating, where heat is transferred by convection flows, a warm floor has a number of advantages:
- The heating part of the system is hidden in the floor structure, which allows to increase the usable area and diversify the design of the rooms, while the floor can be any: tiles, marble, carpet (except for parquet).
- It does not dry the air in the room, since the heating cable does not have direct contact with the atmosphere.
- Double insulation and shielding braid of cables allows the use of heated floors in rooms of any humidity.
First of all, choose your system.
Before you start installing a warm floor, we advise you to make sure that you have chosen exactly the system that is suitable for your room and the desired type of heating (comfortable or basic).
1. The main heating system in separate buildings, including in those cases when it is not possible to connect to the central heating system. The main heating system involves the use of a more powerful cable and a screed device with a thickness of at least 5 cm. Moreover, the area of underfloor heating should be at least 70% of the total area of the heated room. The recommended specific power of the system when using a heated floor as the main heating system is from 160–180 W / m 2. For example, a warm floor with a power of 0.19 kW, a heating area of 1.2 m 2, we check the power: 190 W / 1.2 m 2 = 158 W / m 2.
2. Additional (comfortable) heating system. It is installed in conjunction with other types of heating appliances and is designed to achieve thermal comfort. Most relevant in rooms with cold floors (bathrooms, bathrooms, kitchens, pools) and on the ground floors of buildings. Recommended specific power of the system for comfortable floor heating is 120–140 W / m 2. For example, a warm floor with a power of 0.19 kW, a heating area of 1.5 m 2, we check the power: 190 W / 1.5 m 2 = 126 W / m 2.
Follow regulations Check if the wiring available in your room allows for additional power. Consider additional electrical devices that can be connected to the same network. Also check the permissible current of safety devices (circuit breakers). We recommend connecting electrical heating systems with a capacity of 2 kW or more through special wiring and a separate machine. We also recommend the use of RCDs with a rated tripping current of not higher than 30 mA. This is a small device mounted on an electrical panel that monitors the electrical insulation of your equipment. When heated floors are mounted in humid rooms (bathrooms, saunas, pools), the screen of the heating section must be connected to the ground conductor of the power supply network, which, in turn, must be connected to all available metal parts, such as: metal shower trays, metal frames of showers, etc. How to choose a warm floor
Heating cables
The basis for the construction of underfloor heating is a heating cable. Outwardly, it resembles radio frequency cables for transmitting television signals, but its purpose is not to transmit electrical signals or power to a distance, but to convert all 100% of the power of the electric current flowing through it into heat. The allocation of this power per unit length of cable (specific heat) is the most important technical parameter of heating cables.
| | |
The composition of the system is underfloor heating
- heating section or heating mat,
- control equipment (thermostat with temperature sensor),
- accessories to facilitate and speed up installation (mounting tape, corrugated plastic tube, etc.),
- thermal insulation.
Section of a warm floor
Heating sections
The heating sections are structurally composed of a section of a heating cable of a certain length, and so-called "Cold ends" - pieces of ordinary wire connected to the heating cable with a sleeve. Sections can be made of a single-core and two-core cable, while at the ends you should visually see: in single-core sections - two wires on each side (screen and load), in two-core sections - three wires on one side (screen, load, load) .
Cable laying step
calculated as follows:
Laying step (cm) = (100 * S) / L,
where S is the area on which the warm floor is laid, and L is the length of the cable section.
Minimum installation step - 8 cm
Must remember and single-core and two-core heating sections are necessarily shielded! They can be used both in dry and in wet rooms. Double-layer cable insulation is made of non-combustible and non-consumable materials. Installation of floor heating 1. Underfloor heating To install the system you must: training 2. Drill grooves for electrical wiring, mounting ends of the heating section and tube for the temperature sensor in the wall. thermal insulation 4. Install thermal insulation. fasteners mounting 7. Mount the temperature sensor. 8. Install the thermostat. screed coating 11. Lay the decorative floor covering to your taste. 12. After the screed is completely dry - 28 days, the “warm floor” system is ready for use.
These sections differ in design features and, accordingly, laying methods on the floor surface.
1. Prepare a place in the wall for installing the thermostat. 3. Prepare the floor surface (level, clear of debris). 5. Fasten the pieces of mounting tape. 6. Place and secure the heating section. 9. Make the necessary electrical connections. Check for damage to the heating sections and temperature sensor. Measure the resistance of the section and sensor. Their values should correspond to the passport data. Record the measurement results in the protocol or on the layout diagram of the section. 10. Pour cement-sand screed. After 72 hours, you can walk on the floor.
2. Underfloor heating mats
training | 1. Prepare a place in the wall for installing the thermostat. 2. Drill grooves in the wall for electrical wiring, mounting ends of the heating section and the tube for the temperature sensor. 3. Prepare the floor surface (level, clear of debris). |
| 4. Prepare a groove in the floor for the temperature sensor with a connecting wire that fits in the corrugated tube. | |
| 5. Mount the temperature sensor. 6. Lay the heating mat, gluing it to the surface due to the adhesiveness of the lower side of the grid or using aluminum self-adhesive tape. | |
| 7. Make the necessary electrical connections. Check for damage to the heating mat and temperature sensor. Measure the resistance of the mat and sensor. Their values should correspond to the passport data. Record the measurement results in the protocol or on the layout of the mat. 8. Install the thermostat. | |
| 9. Pour the heating mat with a layer of mortar for fixing tiles with a thickness of 5-8 mm and allow it to dry. 10. Close the groove on the wall with mortar and lay the decorative floor covering to your liking. 11. After the mortar for fixing the tiles has completely dried, the ultra-thin warm floor is ready for use. |
Superthin heat-insulated floor
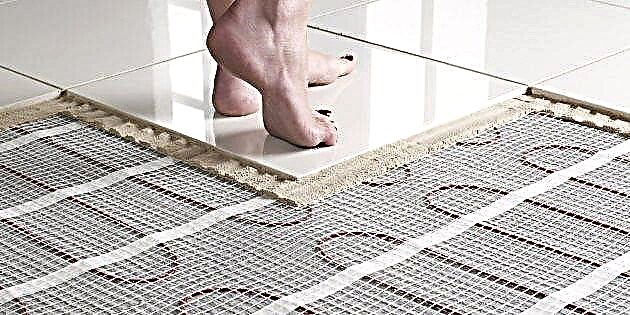
For rooms where a cement-sand screed has already been made, or it is not possible to lay it, ultra-thin heating mats are developed, which are an electric cable of reduced diameter (up to 3 mm), fixed with a constant pitch (about 5 cm) on a supporting fiberglass mesh. Heating mats are a ready-made design that excludes the procedure for laying and fixing the heating cable, so their installation is extremely simple. Mat can be easily cut into fragments (without violating the integrity of the heating cable), which allows you to decompose it on a heated area of any shape. Installation is possible even on old tiles. Two-core heating mats are the most high-tech and environmentally friendly ultra-thin warm floors.
| Room purpose | Optimum power, W / sq.m |
| Kitchen | 100-130 |
| Bedroom | |
| Living room | |
| Hallway | |
| The corridor | 90-110 |
| Bathroom | 120-150 |
| Balcony | Up to 180 |
An example of a project indicating the location of furniture, key components of the system and major distances.
 Electric Underfloor Heating Project
Stage 3 - selection of equipment and materials
The electric underfloor heating system includes:
- heating cable
- connecting wires
- regulator, temperature sensor,
- protection system (residual current devices),
- grounding cable (copper),
- other material: fasteners, dowel-nail, damping tape, chalk (for marking).
A standard tool is used for work: hammer, chisel, punch, metal scissors, tape measure, screwdrivers.
Types of heating cable for underfloor heating
The choice of a heating cable is of decisive importance, therefore, you should be aware that its types are used for installation:
- resistive cable. The heating element is a core, characterized by increased resistance. Due to this resistance, the current moving along the cable is converted into thermal energy,
- self-regulating cable. In this case, heating is due to the polymer matrix. A feature of the self-regulating cable is that overheating is excluded. This type of cable is distinguished by high cost, but also a longer period of operation.
3. Laying insulation
Often, under a warm electric floor, penofol (foamed polyethylene with foil) is mounted. Penofol insulation is a reflective insulation, the peculiarity of the material is its small thickness, the presence of a foil layer (which allows heat to be reflected) and a self-adhesive layer (simplifies the installation process, eliminates the movement of the insulation during cable laying). At the same time, the thermal conductivity coefficient of penofol (at a temperature of 20 ° C is equal to 0.031 W / mK).
Foiled foamed foil is laid up, butt, and the junction of the strips is glued with tape.
In addition to penofol, as insulation can be used: polystyrene foam or polystyrene (with a density above 25) with a layer thickness of 20-50 mm. When installing the system underfloor heating on the balcony, it is recommended to bring the thickness of the insulation layer to 100 mm.
After laying the insulation, the room, around the perimeter, is glued with a damper tape. The purpose of the edge band is to compensate for the expansion of the floor covering during heating.
Since it is recommended to use a solid thermal insulation material, which is characterized by an extremely low hygroscopicity, it is impractical to install a waterproofing mesh.
4. Installation of a temperature regulator
The temperature controller for a warm floor is a control unit, which can be with an external or with an integrated temperature sensor (measures the temperature of the floor). There are temperature controllers with an additional air sensor. The purpose of the thermostat is to provide the ability to regulate the degree of heating of the room and energy consumption.
It is connected to the mains, as well as to the cable of the electric floor through the wires that are laid in the corrugation. Using corrugations will allow performing repair work (if necessary) without violating the integrity of the screed.
5. Mounting the temperature sensor
The temperature sensor for a warm floor is installed directly in the floor, more precisely in the corrugation. At the same time, the masters note the importance of cutting insulation and “warming” the corrugation so that it does not rise much above the heating elements (cable or mat). The bend angle of the corrugation should be smooth to avoid bending the wire and cracking the corrugation. It is recommended that the end of the corrugation extending into the screed be sealed with sealant.
Note: The heat regulator and heat sensor are mounted in each room.
6. Laying the cable underfloor heating
After the service equipment is installed, you can proceed directly to the installation of the cable. Laying an electric floor heating is performed in two ways:
- by installing heating mats. These are ready-made canvases that are good in that they allow you to perform styling quickly and at the same time eliminate the possibility of cable bending or violation of the optimal distance between adjacent loops. The heating mats are attached to the insulating material with tape. The distance between adjacent mats is 50-100 mm, between the mat and the wall - 150-200 mm,
- by installing a special tape with fasteners for cable or metal mesh (a plastic clamp is used as a fastening element, which should not be tightened strongly). With this installation method, the cable is placed by a snake, attention is paid to observing the specified distance between the cable loops.
If there is a joint on the floor of two floor slabs, then in this place it is advisable to lay the cable in the corrugation. This compensates for the possible thermal expansion of the panels and reduces the risk of damage to the underfloor heating system.
The view of the electric floor before starting to fill the screed is shown in the photo.
Stage 5 - checking the electric underfloor heating
Before pouring the screed, you need to check the performance of the system electric underfloor heating. The pre-operational check includes measuring the resistance of the wire. If the deviation from the previous ones, the test is negligible, you can begin to fill the screed.
Measurement is carried out using a multimeter or tester, and then a megohmmeter (used to measure high resistances, above 1,000 V). The result should not be lower than 10 megohms.
Stage 6 - pouring screed
Laying an electric floor heating in the screed is done using a cable or heating mats. In the case of film floors, installation is done without screed.
For the installation of an electric floor in a screed is used:
- concrete screed. The classic mortar for concrete screed consists of 4 parts of sand, 1 part of cement M400, 0.5 parts of water.When using cement M200, the ratio will be 2: 1. To increase the elasticity of the solution, you can add plasticizers (1%). The advantage of a plasticizer in cheapness, the lack of a long period of complete drying,
- bulk floor. The height of the bulk floor is 3-10 mm. Therefore, it must be applied in several layers. Bulk floor is recommended when an electric heated floor is laid under the laminate,
- tile adhesive. Tested according to user reviews, an option that is advised to give preference if an electric underfloor heating is installed under the tile.
Regardless of the type used for screed material, the optimal height (thickness) of the screed is 30-50 mm.
The cost of installing a heated electric floor per 1 m2
As you can see, the installation of an electric floor does not cause great difficulties. The table below shows the cost of installation with the involvement of hired craftsmen. On average, the price per m2 for turnkey installation is 600 rubles / sq.m. excluding the cost of materials.
After analyzing the proposals of different companies, the cost of installing an electric heated floor with materials will vary from 2,000 to 4,700 rubles per square meter (according to the end of 2016). At the same time, the minimum price is valid for orders of 250 sq.m. or if the announcement was given by a private master, and not a construction company.
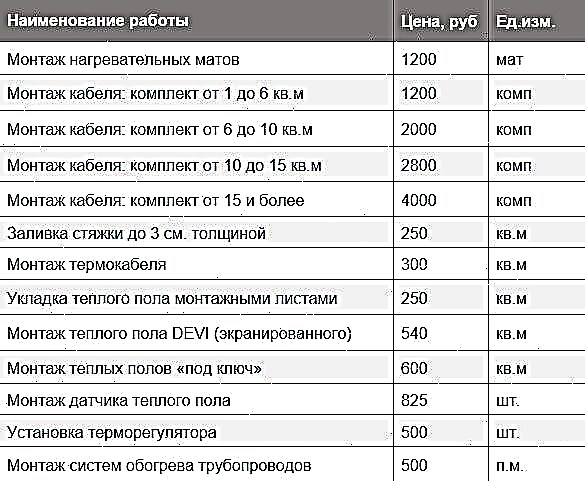
Thus, doing the installation of an electric heated floor with your own hands is an opportunity to significantly save on work.
Electric floor heating installation - errors
Here are some common mistakes that, as evidenced by the reviews of home masters, are very common:
- purchase of excess material. The error is due to the fact that in the calculations the user focuses on the total area of the room, and not on the one that will serve as the basis for the heated floor. The calculation does not take into account the area occupied by furniture and heavy household appliances (refrigerator, washing machine),
- the cable used in the heating mat cannot be cut. You need to choose such a stacking scheme in order to use the mat fully. It’s better to leave part of the floor surface uncovered,
- Do not turn on the underfloor heating system until the screed is completely dry, as this can lead to uneven drying of the layer and the appearance of cracks and voids.
- the cable must not be laid on an unprepared surface. It is better to treat the surface of the subfloor with a primer to eliminate dust, which can lead to air pockets around the cable and cause it to overheat,
- the temperature sensor is placed in the corrugation, so it can be removed and repaired if it fails,
- resistance measurement is an important step in the pre-operational test of an electric floor; do not ignore it. If there are significant deviations, you need to make a decision to correct the situation on your own or to attract professionals,
- The cable management scheme is useful when moving furniture and performing repairs or maintenance. The easiest way is to photograph the mounted floor before pouring the screed.
Electric underfloor heating is unpretentious in operation, reliable (when choosing good components and proper installation) and will last a long time.

 Left convective air heating, right - thermal radiation / pol-exp.com
 Cable floor heating device / my-kvartira.com
 remontnik.org
 termoradosti.com
 trans-mix.ru


 Types of electric underfloor heating
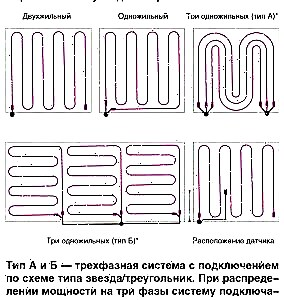 Options for laying heating cables for electric underfloor heating
  Options for laying heating mats with rotation of 90 and 180 degrees
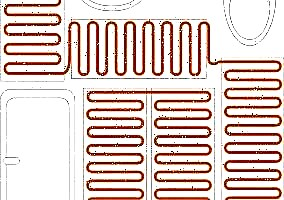 Layout of cable underfloor heating in the bathroom
  The project of electric underfloor heating in the bathroom